
DigitalOcean is a great VPS provider, they provides an inexpensive cloud service with reliable servers in many locations worldwide. I have used DigitalOcean to host my client sites for a couple years and never had any problem with them.

One of the things that made DigitalOcean to be the best for choose is they have thousands of easy to follow guides covering almost everything for any type of website. These fantastic guides will help you get started with DigitalOcean easy than ever.
But in this topic I will discuss a case that you will not be able to find the answer in DigitalOcean’s guide lines, that is How you can save the cost of Unused Droplets. I write this tutorial because there are still some who only use their droplets few days per month. And although there’s an easy option to turn ON and OFF a droplet in the control panel, but it doesn’t help towards the bill because you are still using space and resources even if your droplet is turned off, so of course you must pay for that.
So what is the way to save my bucks on unused droplets? The solution is to take a snapshot of your droplet and destroy it. And whenever you need, you can restore it from the snapshot you created. Doing so will reduce the cost because the snapshots now only cost $0.05/GB/mo and you can have an account with only snapshots and no droplets.
But there will be a problem that you will need to update DNS setting of your domain each time you recreate your droplet because any new droplet will come with a random IP address and you will dont know what it is. So the next solution to solve this that is allocate a static IP address to your account and assign it to new droplet whenever you create a new one, these are called Floating IPs. Floating IP and Droplet’s IP will be pointed to your droplet at the same time, so you just need to update your DNS settings to use Floating IP and now whenever you create a new droplet from the snapshot, nothing else needs to be changed.
Let’s get started!
Step 1: Create and Assign Floating IP To Your Account.
To do this, you will need a DigitalOcean account and have an active droplet. If you don’t already have one, you can register now to receive free $100 credits.
1. Login to your account.
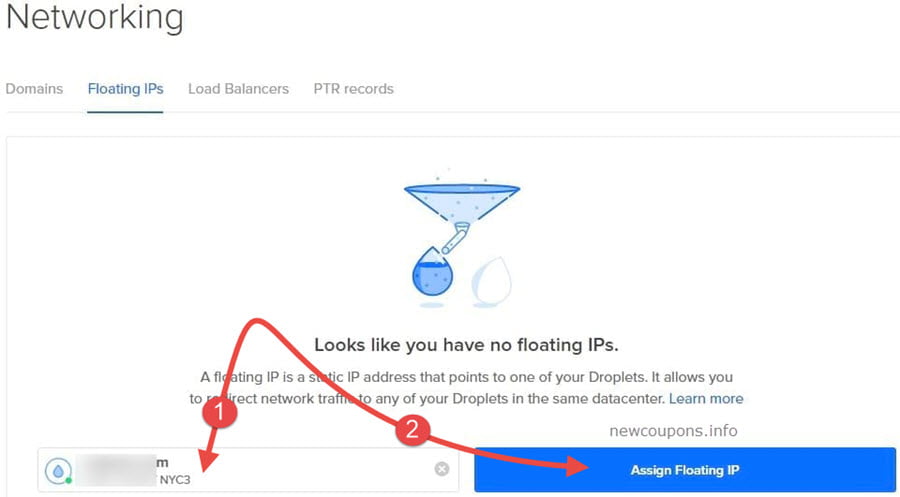
2. Click to Networking tab, then Floating IPs.
3. In Search for a Droplet, choose the droplet you want to point the Floating IP to, and click Assign Floating IP.
After done, you will have 2 IP assigned to your droplet at this point. You will need to update your DNS to use new IP address and reconfigure any software installed on your server to new IP address.
Step 2: Create The Snapshot And Destroy Your Droplet
First of all, use the command line: sudo shutdown -h now to shutdown your droplet.
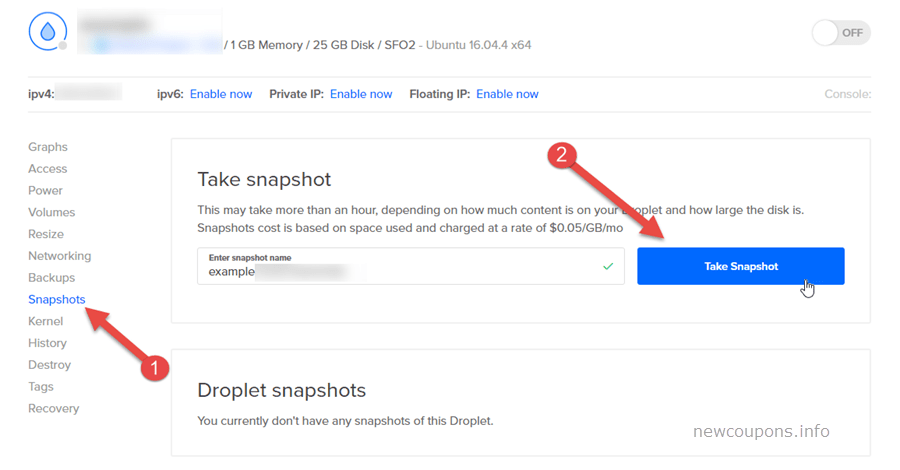
1. In account manager, click the droplet name.
2. Click Snapshots on the left side menu.
3. Enter a friendly name for your snapshot and hit Take Snapshot button.
It can take few minutes to create the snapshot and when it’s done, let destroy your droplet. From now, you no need to pay for that droplet but you will still be charged for storage of snapshot and unassigned floating IP address, but these costs are far less than the droplet cost.
The Last Step
You only do this step when you need to use your website or app. This will create a new droplet on DigitalOcean so you will be charged for it.
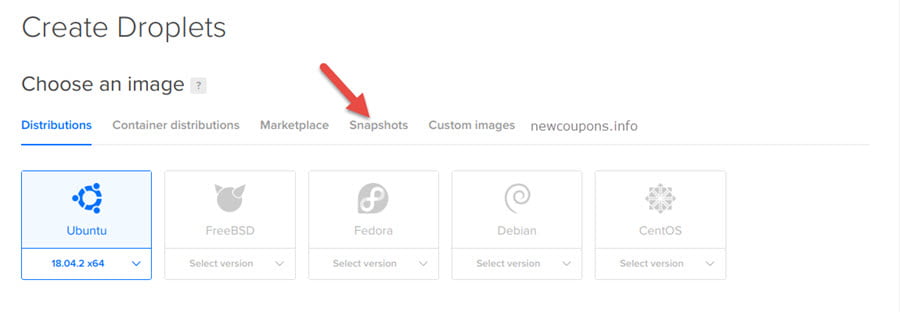
1. Login to your account, then click Create Droplet button.
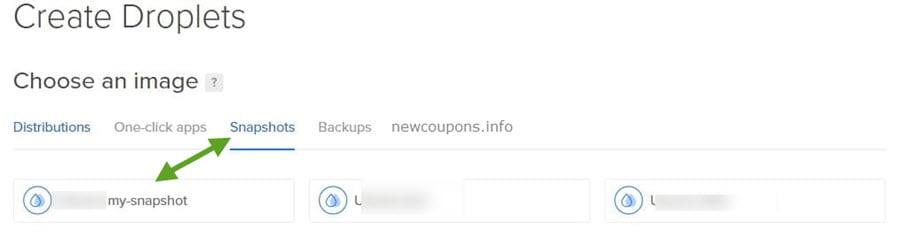
2. Choose Snapshots tab under Choose an image.
3. Select the snapshot you wanna use.
4. From this steps, you just create a new droplet as you normally do.
Once the droplet creating process is done, you will have a new droplet from the snapshot image you choose. Now you need to assign your floating IP address to this new droplet, you can do this by navigate to Networking > Floating IPs and choose the new droplet name (same as the step 1).
After assigned the floating IP to new droplet, you’re done. Nothing else needs to be changed because you has used the floating IP address in DNS setting of your domain (step 2). And after done your job, you can do repeat the step 1 & 2 to save your costs.
Bottom Line
That’s all in this guide. Even DigitalOcean Droplet is very cheap ($5/mo) and you can use digitalocean coupon to get some free credits, but in fact we should only pay for what we use, right?
Hope this will help you save some money on DigitalOcean. If you have any issues or doubts about the method, please feel free to let me know and we will discuss together.
Wish you succeed guys 🙂

